![]()
"Shadow Caster" is a game in which you can morph between 6 different living forms, each having its own capabilities. This usualy gives several possibilities to make it through difficult situations, but sometimes the right form will be required to work it out ... you'll just have to experiment and find which one.
***SPOILER*** - 3D Maps
I extracted 3D scenes from .DAT files, and added the Items/Critters/Doors from .LIB files.
The result is in Microsoft's .X format: the 23 levels of the CD-ROM version.
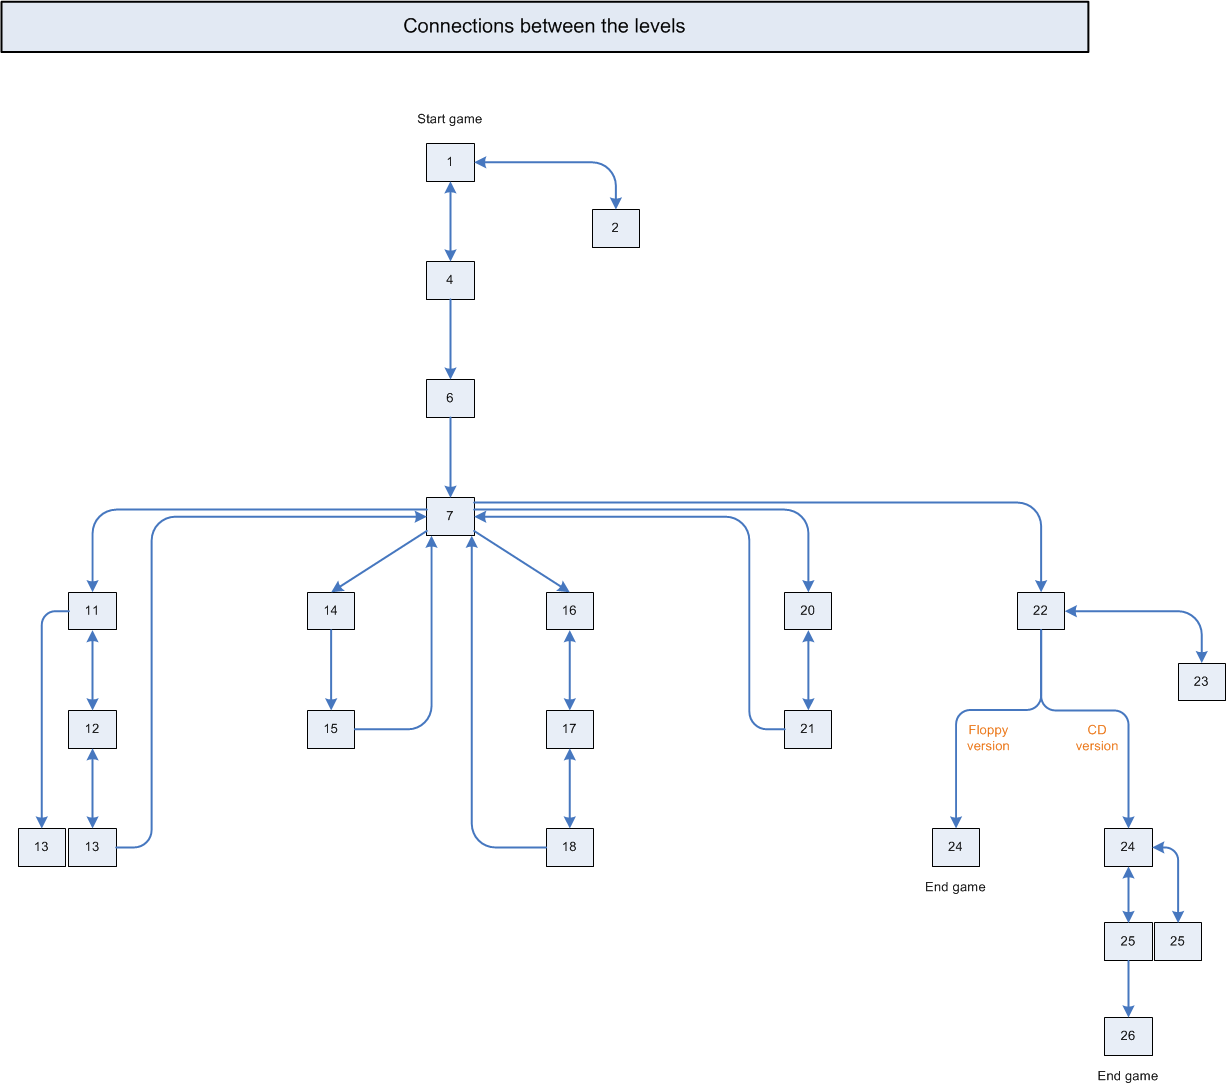
NB: in the floppy version, the CD-ROM's levels 24 and 25 don't exist, and the level 26 (endgame) becomes level 24.
 |
- Critters are drawn as vertical sprites facing south - Items are drawn as horizontal sprites, usually laying on the ground - Some ojbects have been enhanced (to simulate 3D...), like trees or pillars - for in-door levels, the ceilings are excluded (in order to view inside the levels) |
Since some levels are technically split in several levels, I merged them in order to view them fully.
 |
Exemple with the pool (level 5) below level 4 |
Misc. downloads
Floppy version :
CD version :
A simple view of how the different levels are connected to each other:
***SPOILER*** - 2D Walkthrough
Why another walkthough for a game released in 1993 ?
The point is that I never found any walkthrough including the maps of the different levels, so here's a simple solution mainly based on these lacking maps (taken from screenshots in the game):
Well I finally stumbled on isometric maps by Ryan Armstrong (see the links section at the bottom)
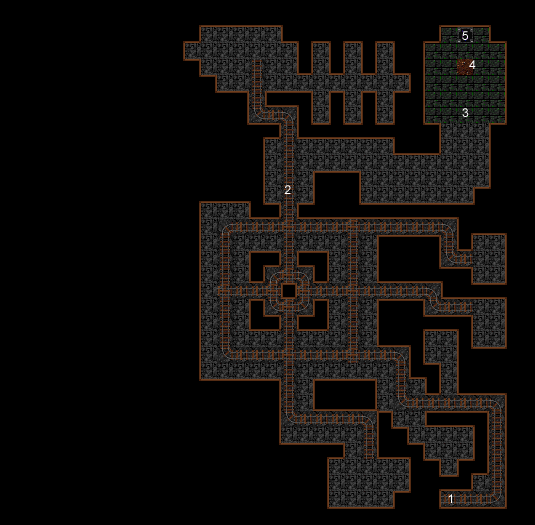
LEVEL 1
 |
1 : you start here 2 : an obelisk => you get the Maorin (feline) form 3 : a teleport to #3' 4 : a floating chest throwing fireballs. Shoot it with the firewand => get the silver triangle key. Use this key on the cylindar structure near you => the stone statue slides, revealing a teleport to level 2 (L2 #1) 5 : a teleport to/from level 4 (L4 #1) 6 : get the fire wand 7 : get the shuriken 8 : shoot the 3 fireball launchers (with the firewand from #6 or the shuriken from #7) 9 : get the statue head 10 : teleported here back from level 2 (L2 #8) |
Special places :
| #2 : the obelisk |  |
|||
| #4 (before teleport) : |  |
#4 (with teleport) : |  |
LEVEL 2
 |
1 : teleported here from level 1 (L1 #4) 2 : pull the chain to drain the water => you reach Level 3 |
LEVEL 3
 |
2 : below the chain that you pulled at level 2 3 : get the skull 4 : put the skull on the headless skeleton Kill the skeleton => a secret door #5 opens 5 : secret door 6 : get the weapons 7 : get the statue head (you have 2 now) 8 : a teleport back to level 1 (L1 #10) |
Special places :
| #2 : the chain |  |
|||
| #3 : the skull |  |
#4 : the headless skeleton |  |
LEVEL 4
 |
1 : a teleport from/to level 1 (L1 #5) 2 : get the key => 4 secret doors open (#3) 3 : secret doors with foes 4 : open the chest => get the acid wand 5 : get the statue head (you have 3 now) 6 : get the ice wand 7 : get the statue head (you have all 4 now) 8 : put each skull in one niche => opens stairs in #9 9 : stairs teleporting to level 6 (L6 #1) |
Special places :
| #2 : the key |  |
| #7 : the 4th skull #8 : a niche |  |
LEVEL 6
 |
1 : teleported here from level 4 (L4 #9) 2 : get the potions 3 : shoot the floating thing (with shuriken) to open bridge 4 : a tough liche ! 5 : open the chest => get the dragon horn 6 : an obelisk => you get the Caun (healer) form 7 : a teleport to level 7 (L7 #1) |
Special places :
| #3 : the floating thing |  |
#3 : the bridge over acid water |  |
|
| #6 : the obelisk |  |
LEVEL 7
 |
1 : teleported here from level 6 (L6 #7) 2 : shoot the 4 floating things to open the secret door #3 3 : a secret door 4 : a tough liche ! 5 : a teleport to level 11 (L11 #1) 6 : a teleport to level 14 (L14 #1) 7 : a teleport to level 16 (L16 #1) 8 : a teleport to level 20 (L20 #1) 9 : teleported here back from level 13 (L13 #7) 10 : a secret door (opens when coming from #9) 11 : teleported here back from level 15 (L15 #9) 12 : a secret door (opens when coming from #11) 13 : teleported here back from level 18 (L18 #4) 14 : get the horn of caun 15 : break this column (?) 16 : a secret door (opens when coming from #13) 17 : teleported here back from level 21 (L21 #12) 18 : a secret door (opens when coming from #17) 19 : each time a path is completed (#5 to #8), an obelisk appears 20 : when all 4 paths are completed (#5 to #8), a teleport appears leading to level 23 (L23 #1) |
Special places :
| #2 : a floating thing |  |
|||
| #15 : the column (what use ?) |  |
|||
| #19 : when a path is completed, another obelisk appears |  |
#19 and #20 : when all paths have been completed, the teleport appears in the middle of the room |  |
LEVEL 11
 |
1 : teleported here from level 7 (L7 #5) 2 : pull the chain to open the cells 3 : pull the chain to lower the cage Then dive in the mud to get the Caun armor in #4 4 : get the Caun armor 5 : get the Silver sword 6 : get the Silver armor 7 : stairs to/from level 12 (L12 #1) 8 : stairs to/from level 13 (L13 #1) |
Special places :
| #2 : pull the chain |  |
|||
| #3 : pull the chain |  |
#3 : the Caun armor in the mud |  |
LEVEL 12
 |
1 : stairs to/from level 11 (L11 #7) 2 : power fountain (use Caun to heal) 3 : get the lightning wand 4 : stairs to/from level 13 (L13 #2) 5 : a teleport to #6 6 : a teleport back to #5 7 : book of Leffra (talks about the power fountain in #2) |
Special places :
| #2 : the power fountain |  |
LEVEL 13
 |
1 : stairs to/from level 11 (L11 #8) 2 : stairs to/from level 12 (L12 #4) 3 : kill the feline lord => get the obelisk tip, and the staff of power 4 : an obelisk : put its tip on it => you get the Opsis (magician) form 5 : get the Chalice of power 6 : open the chest => get the Crystal of light, and the Caun sword 7 : a teleport back to level 7 (L7 #9) 8 : a journal about Opsis and werewolves |
Special places :
| #3 : the obelisk tip, and the staff of power |  |
#4 : the obelisk (without its tip yet) |  |
LEVEL 14
 |
1 : teleported here from level 7 (L7 #6) 2 : kill the slaver => get the amulet of defense 3 : pull the lever to restore the tree of life in #3, and open a teleport in #5 4 : the tree of life (eat the fruits to restore yourself) 5 : a teleport to level 15 (L15 #1) |
Special places :
| #3 : the lever (before restoring the tree) |  |
#3 : the tree restored |  |
LEVEL 15
 |
1 : teleported here from level 14 (L14 #5) 2 : get the fire wand 3 : power fountain (fly over the acid water to reach it) 4 : get the shock horn 5 : pull the chain to open the secret door in #6 6 : a secret door 7 : get the obelisk tip 8 : an obelisk : put its tip on it => you get the Kahpa (froghen) form, and the teleport in #9 is revealed 9 : a teleport back to level 7 (L7 #11) |
Special places :
| #5 : in the middle of the acid water, the chain to pull from the ceiling |  |
LEVEL 16
 |
1 : teleported here from level 7 (L7 #7) 2 : open the chest => get the water canon 3 : open the chest => get the water armor and strength potion 4 : get the trident of might 5 : get the key to open the gates in #6 6 : gates 7 : dive into water to reach the level 17 (L17 #1) |
LEVEL 17
 |
1 : dive up to go to level 16 (L16 #7) 2 : get the lightning wand 3 : get the amulet of defense 4 : kill the king 5 : get the water tablet 6 : a teleport to/from level 18 (L8 #1) |
LEVEL 18
 |
1 : a teleport to/from level 17 (L7 #6)) 2 : put the water table (from level 17 #5) in the acid water => the acid turns into pure water, and the dragons won't attack you anymore 3 : an obelisk => you get the Ssair (dragonoid) form, and the teleport in #4 is revealed 6 : a teleport back to level 7 (7 #13) |
LEVEL 20
 |
1 : teleported here from level 7 (L7 #8) 2 : break the chain to open the secret door in #3 3 : a secret door 4 : get the obelisk tip 5 : power fountain 6 : get the boulders, and put them on the plates in #7 => the ceiling will lift up, revealing a chain in #8 7 : the plates 8 : pull the chain => the secret door in #9 opens 9 : a secret door 10 : a teleport to/from level 21 (L21 #1) |
Special places :
| #2 : the chain |  |
|||
| #3 : a plate |  |
|||
| #8 : without the chain (hidden in the ceiling) |  |
#8 : with the chain |  |
LEVEL 21
 |
1 : a teleport to/from level 20 (L20 #10) 2 : a frog carving : feed it (with the caun horn, or caun's insect swarm spell) => the secret door in #3 opens 3 : a secret door 4 : get the hourglass 5 : come back later with the Grost form and break this wall => book of credits behind 6 : an obelisk, moving around the room 7 : a receptacle : put the hourglass (from #4) in it => time stops and the obelisk stops moving. Put the tip on top of the obelisk #6 => you get the Grost (golem) form (from now, morph to this form and use his punch and earthquake habilities) 8 : break the walls in #8 9 : a power fountain 10 : get the cane of force 11 : break the wall, and get the chalice of power 12 : a teleport back to level 7 (L7 #17) |
Special places :
| #2 : the frog carving |  |
|||
| #6 : without the obelisk |  |
#6 : with the obelisk |  |
|
| #7 : the receptable for the hourglass |  |
LEVEL 22
 |
0 : teleported here from level 7 (L7 #20) 1a : dive to level 23 (L23 #1) to get to (1) 1 : kill the big heart hung on the ceiling, and get the blood crystal fallen above Dive and return to level 23 (L23 #2) 2 : the 3 colored altars => put the blood crystal on the red altar 3 : get the potion of power 4 : get the stone sword 5 : stone statue : put the stone sword in its hand => the secret door in #6 opens 6 : a secret door 7 : get the flesh crystal. Return to #2 and put the flesh crystal on the brown altar 8 : a chest => get the power potion, the health potion, and the scepter of might 9 : get the bone crystal. Return to #2 and put the bone crystal on the blue altar When all 3 altars are completed, a teleport appears in #10 10 : a teleport to level 24 (L24 #1) - Floppy version: Level 24 will be the last level (you meet Veste) - CD version: Levels 24 & 25 are specific to this version, before meeting Veste at Level 26 |
Special places :
| #1 : the blood heart |  |
#6 : the blood crystal (in the pool of blood) |  |
|
| #2 : the 3 altars |  |
|||
| #5 : the stone statue |  |
#5 : ...with its sword |  |
LEVEL 23
 |
1 : dive up to return to level 22 (L22 #1a) 2 : dive up and continue to level 22 (L22 #1) |
(CD version only) => LEVEL 24
 |
1 : teleported here from level 22 (L22 #10) 2 : use the Caun's telekinesis spell to catch this key 3 : use the key on this door 4 : a teleport to/from level 25 (L25 #1) Dive into the acid pools to reach every area of this level (through Level 25-A). |
(CD version only) => LEVEL 25
|
LEVEL 25-A Dive down from level 24 and then up, to reach every area of level 24. |
LEVEL 25-B 1 : a teleport to/from level 24 (L24 #2)2 : a teleport to level 26 (L26 #1) |
|
_CD.png) |
 |
(Floppy version)=> LEVEL 24
(CD version)=> LEVEL 26
Meet Veste !
 |
1 : teleported here from level 22 (L22 #10) for Floppy version, or from level 25 (L25 #2) for CD version 2 : Veste is here, waiting for you ... the fight will be very hard as Veste will morph between 6 forms before you defeat him! |
Special places :
| #2 : Veste, in his initial appearence |  |
|||
| #2 : Soon he morphs before he engages the fight |  |
#2 : ...and he's very angry ! |  |
ENDGAME (floppy version)
| Veste is defeated... |  |
And you receive congratulations |  |
|
| Everybody is happy |  |
...but WAIT, what's that on your back ?! |  |
Links
Detailled walkthroughs :
3D isometric maps by Ryan Armstrong ('Zerker')
Cheats :
